Peptide Purity Testing: Complete Checklist for Buyers
Peptide Purity Testing: Complete Checklist for Buyers
Peptide purity testing isn’t optional - it’s a must. The peptide market operates in a regulatory gray area, with independent testing platforms routinely identifying mislabeled, underdosed, or contaminated products across gray-market vendors. This guide breaks down how to verify peptide quality in just a few steps, ensuring safety and effectiveness.
Key Steps to Evaluate Peptide Quality:
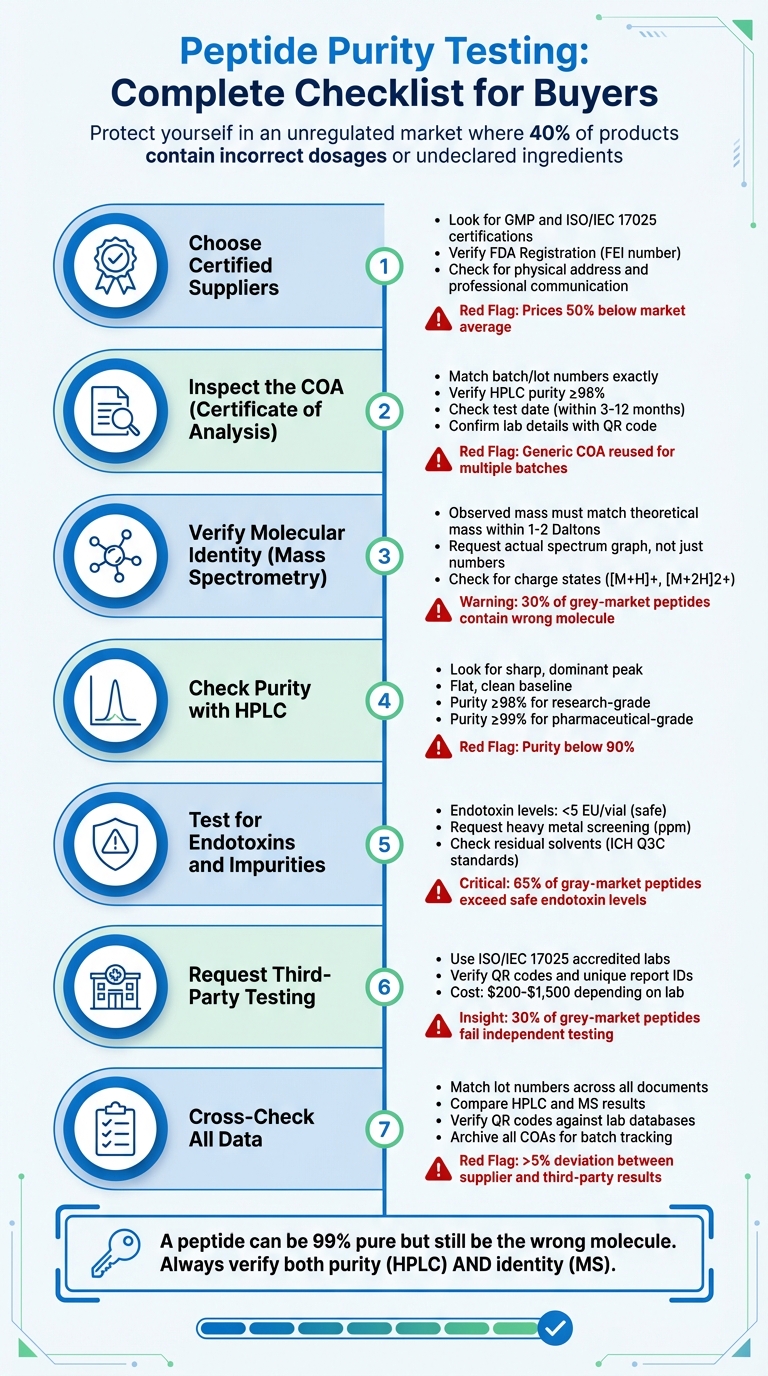
- Choose Certified Suppliers: Look for GMP and ISO/IEC 17025 certifications. Avoid vendors with vague credentials or unverified claims.
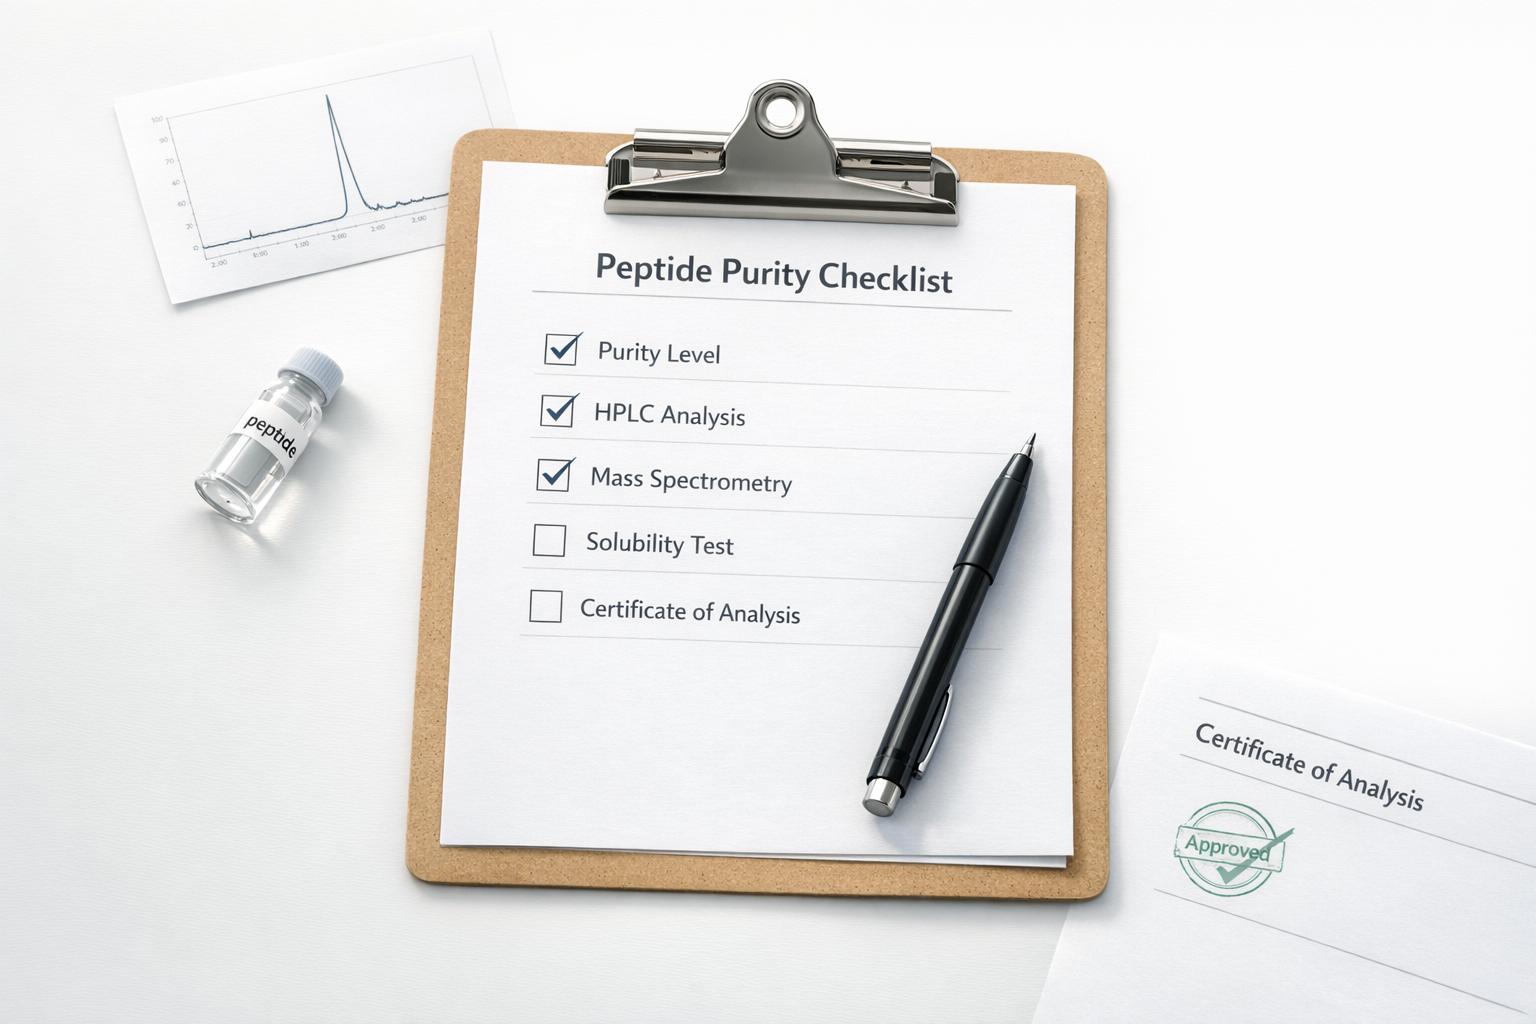
- Inspect the COA (Certificate of Analysis): Confirm batch numbers, HPLC purity (≥98%), and MS data for molecular identity. Watch for missing or generic data.
- Verify Molecular Identity: Use mass spectrometry to ensure the peptide matches its theoretical mass within 1–2 Daltons.
- Check Purity with HPLC: Look for a sharp, dominant peak on the chromatogram. Purity below 90% signals issues.
- Test for Endotoxins and Impurities: Ensure endotoxin levels are under 5 EU/vial. Request heavy metal and solvent analysis.
- Request Third-Party Testing: Independent labs can confirm vendor claims, reducing risks of mislabeled or contaminated peptides.
- Cross-Check All Data: Match lot numbers, review test dates, and verify lab credentials using QR codes or unique IDs.
Why it matters: Contaminated or mislabeled peptides can trigger immune reactions, disrupt research, or harm health. Following this checklist ensures you’re buying safe, high-quality peptides - especially crucial in an unregulated market.
7-Step Peptide Purity Testing Checklist for Safe Purchases
How to Verify If Your Peptide Is Actually Legit #peptides #testing
sbb-itb-7fad836
Step 1: Choose Suppliers with ISO and GMP Certifications
Getting reliable, high-quality peptides starts with choosing suppliers who meet rigorous manufacturing standards. Look for Good Manufacturing Practices (GMP) certification and ISO/IEC 17025 accreditation. These certifications ensure that every step - from sourcing raw materials to final packaging - is carried out under strict, validated procedures. This minimizes risks of contaminants like bacterial endotoxins, heavy metals, or residual solvents. While GMP certification applies to manufacturers, ISO/IEC 17025 accreditation confirms that testing labs use independently verified methods, guaranteeing accurate and reliable results.
Why does this matter? Contaminants, especially bacterial endotoxins, can’t be removed by standard 0.22-micron sterile filters. Without GMP-level controls, these impurities can trigger severe immune responses. Alarmingly, audits have shown that many vendors skip key quality checks, operating in a regulatory gray area where issues like these are common.
How to Verify Supplier Credentials
Before making a purchase, verify the supplier’s certifications. Here’s how:
- Check FDA Registration: Suppliers manufacturing for pharmaceutical or compounding use should appear in the FDA Registration & Listing Database under an FDA Establishment Identifier (FEI). Note that vendors selling peptides strictly as research-use-only (RUO) products are generally not required to register under Human Drugs or Biologics — the absence of an FEI listing does not by itself disqualify a research supplier, but its presence is a positive signal.
- Confirm ISO/IEC 17025 Accreditation: Review the Certificate of Analysis (COA) to see if it lists an accredited lab. Visit the lab’s website and confirm the supplier appears under "Client Reports." Legitimate COAs often include QR codes or unique report IDs that link directly to the lab’s database, ensuring authenticity.
Watch Out for Red Flags
Be cautious if you notice any of the following:
- The supplier communicates only via WhatsApp or Telegram.
- They lack a verifiable physical address.
- Prices are suspiciously low - 50% below market average.
- COAs are generic and lack batch-specific information.
If a supplier claims "pharmaceutical grade" or "GMP manufactured", request their facility certifications and process validation documents. Also, ask about TFA residual levels and the methods used for quantification. Vague or evasive answers are a major warning sign.
Lastly, always cross-check the batch number on your peptide vial with the number listed on the COA. Suppliers based in the U.S. with GMP-certified facilities are often a safer choice, as they follow stricter regulatory standards and document every step of the manufacturing process.
Step 2: Review the Certificate of Analysis (COA)
After confirming your supplier holds the necessary certifications, the next step is to carefully examine the Certificate of Analysis (COA). This document serves as proof that the peptide has undergone proper testing and verification. A legitimate COA provides detailed evidence, not just marketing jargon, and is essential for ensuring the peptides meet strict scientific standards, which helps safeguard your research and safety.
Start by verifying that the batch or lot number on the COA matches the vial label and invoice exactly. If the supplier uses the same COA for multiple batches, it’s a red flag indicating inadequate testing. Next, check the purity percentage - research-grade peptides should have a purity of at least 98%. However, don’t just take the number at face value. High-Performance Liquid Chromatography (HPLC) should confirm the purity, while Mass Spectrometry (MS) should verify the peptide’s identity. A valid COA will include both HPLC chromatograms and MS spectra for visual confirmation. Without these, you’re relying solely on the supplier’s claims.
Pay close attention to the Observed Mass from the mass spectrometry data. These values should align within a range of 0.5 to 1.0 Da. If the difference exceeds this range, it's essential to ask your supplier for clarification. Alarmingly, studies suggest that 30% of peptides from unregulated sources contain incorrect compounds. Additionally, check the test date - a COA older than 3–12 months may signal issues, as peptides degrade over time and testing is specific to each batch.
Lastly, verify the testing laboratory details. A legitimate COA will list the lab’s name, an analyst’s signature, and often include a QR code or unique verification ID. Use this information to confirm the COA in the lab’s database. Well-known labs like Janoshik Analytical and MZ Biolabs are recognized for providing verifiable reports. Be cautious of round numbers in the results; authentic analytical data typically includes slight decimal variations.
Here’s a quick reference table highlighting the key elements of a COA and what to watch out for:
COA Components Table
| COA Element | Required Detail / Benchmark | Warning Signs (Red Flags) |
|---|---|---|
| Lot Number | Must match vial label and invoice exactly. | Missing lot number or reused COA for different batches. |
| Purity (HPLC) | ≥98% for research-grade; sharp, symmetrical main peak. | "98%" claim without a chromatogram image; messy baseline. |
| Identity (MS) | Observed mass should match theoretical weight within 1–2 Da. | No mass spec data; mass difference greater than 2 Da. |
| Test Date | Ideally within the last 3–6 months. | Date older than 12 months; date doesn’t align with purchase. |
| Endotoxins | Reported in EU/mL; USP limit <5 EU/kg/hr. | Missing for injectables; reported as "0". |
| Lab Info | Traceable lab name, analyst signature, QR code. | Untraceable lab; missing signature; no online verification. |
| Appearance | For example, "White lyophilized powder." | Generic descriptions; mismatches with the actual product. |
Step 3: Verify Peptide Identity with Mass Spectrometry Data
Once you've confirmed that the Certificate of Analysis (COA) is complete, the next step is verifying the peptide's identity. While HPLC analysis gives you a clear picture of the sample's purity, it won't tell you if the peptide is correct. A sample might be 99% pure but still turn out to be the wrong molecule. This is where mass spectrometry (MS) comes into play - it’s the most reliable method for confirming what’s actually in the sample.
Mass spectrometry works by measuring the molecular weight of the peptide. The critical comparison here is between the "Observed Mass" and the "Expected (Theoretical) Mass". These values should align within a range of 0.5 to 1.0 Da. If the difference exceeds this range, it’s essential to ask your supplier for clarification. A trustworthy COA will include the actual mass spectrum graph, not just a written claim of the molecular weight. Why? Because a detailed spectrum is much harder to falsify.
Another important aspect to examine is the charge states in the mass spectrometry report. Larger peptides often display multiple peaks, which correspond to different ionization states like [M+H]+, [M+2H]2+, or [M+3H]3+. The software used in the lab processes these peaks to calculate the final molecular weight. Additionally, MS can help identify specific synthesis problems. For example:
- A 16 Da mass shift might indicate oxidation.
- A 1 Da increase could suggest deamidation.
- A 114 Da increase per molecule might point to trifluoroacetic acid (TFA) adducts.
Data from published studies highlights the importance of this step: about 30% of grey-market peptides have been found to contain the wrong molecule. This makes thorough verification non-negotiable.
If the COA lacks MS data, consider it a major warning sign. Always request both HPLC and MS reports - ideally an LC-MS analysis, which combines spectrum data with chromatographic separation. Cross-check the mass spectrometry data with the HPLC chromatogram to ensure the primary peak matches the correct molecular weight.
Lastly, take a moment to confirm the credentials of the testing laboratory. Reliable COAs often include QR codes or verification keys, allowing you to trace the lab’s authenticity. If the lab is untraceable or the report lacks a spectrum graph, it’s wise to seek third-party peptide testing.
Once the peptide's identity is confirmed, proceed to verify its purity using the HPLC results for a complete evaluation.
Step 4: Check Purity Using HPLC Results and Chromatograms
Once you've confirmed the peptide's identity, it's time to assess its purity using HPLC. While mass spectrometry (MS) establishes the molecular identity of the peptide, HPLC evaluates its purity. Together, these methods provide a comprehensive view of the peptide's quality. HPLC works by separating the peptide from impurities and quantifying the target peptide in relation to byproducts and degradation products. This is done by comparing the target peak area to the total UV-absorbing area.
The chromatogram, the graphical output from HPLC, is your key piece of evidence when assessing quality. It's not enough to rely solely on the purity percentage - always examine the chromatogram itself. This visual representation helps confirm the presence of your target peptide and any impurities.
A high-quality chromatogram typically features a single, sharp, dominant peak with a flat, clean baseline. This main peak represents your target peptide. If you notice multiple peaks or "shoulders" near the same retention time, it could indicate degradation or isomer formation. An elevated baseline suggests unresolved impurities, which could compromise the peptide's overall quality.
Purity thresholds are important to keep in mind. Peptides with a purity level of 98% or higher are generally considered high quality. Pharmaceutical-grade peptides often achieve 99% purity or higher, while research-grade peptides usually fall between 95% and 98%. Purity levels below 90% may indicate the presence of significant impurities. Be cautious of reports showing exact values like "99.00%" or "0.00" for all metrics - real analytical data usually includes slight decimal variations.
It's also crucial to understand what HPLC measures. HPLC determines relative purity, focusing on peptide-related impurities, but it doesn't account for non-UV-absorbing substances like water, salts, or counter-ions. As a result, a peptide might show 99% purity on HPLC but have only 70–85% net peptide content due to these residual compounds. This is why HPLC is used to confirm purity, while MS is relied upon for verifying molecular identity.
Below is a quick comparison of key analytical methods:
Analytical Methods Comparison Table
| Method | Purpose | Data Provided | Limitations |
|---|---|---|---|
| HPLC | Measures relative purity/cleanliness | Chromatogram peaks; purity percentage based on peak area | Cannot confirm molecular identity; misses non-UV-absorbing contaminants like salts and water |
| Mass Spectrometry (MS) | Confirms molecular identity | Molecular weight (mass-to-charge ratio); observed vs. expected mass | Does not quantify purity levels accurately on its own |
| Amino Acid Analysis (AAA) | Confirms composition and net content | Ratio of individual amino acids; actual peptide weight (mg) | Expensive and complex; does not show impurity peaks like HPLC |
Step 5: Confirm Endotoxin and Impurity Testing
When evaluating peptides, it's not enough to rely solely on molecular identification or HPLC purity data. These methods might show the percentage of peptide-related contaminants but won't reveal the presence of bacterial toxins or chemical residues. One major concern is endotoxins - fragments of bacterial lipopolysaccharides that can survive sterilization processes and bypass standard 0.22-micron filters. Even in peptides with high purity, endotoxins can provoke severe immune responses.
To ensure safety, your Certificate of Analysis (COA) should include detailed results for endotoxin testing, heavy metal screening, and residual solvent analysis. Endotoxin testing is typically performed using the LAL assay or recombinant methods like rFC or rCR. Avoid COAs that simply state "Pass" without providing exact numerical values. For endotoxins, results should be expressed in EU/mL or EU/vial — the per-vial limit must be calculated using the USP formula (5 EU/kg/hr × patient weight ÷ maximum hourly dose), so there is no single universal vial threshold. Heavy metals should be listed in parts per million (ppm).
For reference, a 176-lb (80-kg) individual can experience fever if exposed to more than 400 EU of endotoxins per hour. The USP-derived endotoxin limit is 5 EU/kg/hr, meaning the acceptable EU/vial varies with dose and patient weight. For typical research peptide doses, this often translates to single-digit EU/vial — but no universal fixed per-vial threshold exists in pharmacopeial standards. Peptides with elevated endotoxin levels warrant closer examination; testing platforms like Finnrick have proposed informal risk classifications, but these are not derived from any pharmacopeial standard and should be interpreted accordingly.
In addition to endotoxin testing, ensure that heavy metals meet USP limits and residual solvents adhere to ICH Q3C standards. Testing for endotoxins usually costs between $150 and $400 per sample, while comprehensive impurity analysis can range from $800 to $5,000, depending on the scope of the evaluation. While these tests can be costly, they are essential for preventing both immediate and long-term health risks. To further validate safety, cross-check results with independent third-party laboratory data. This extra step ensures you’re working with peptides of the highest quality.
Step 6: Request Third-Party Lab Verification
Once you've checked endotoxin and impurity levels, taking the extra step of independent testing ensures the quality of your peptide. Even with a supplier-provided Certificate of Analysis (COA), you're still relying on the vendor's own data. Third-party testing, on the other hand, involves an unbiased facility confirming the peptide's quality - offering peace of mind.
"The same organization that profits from selling the peptide is also the one certifying its quality. Third-party testing eliminates that conflict." – Peptide Journal
When choosing a lab for verification, prioritize those with confirmed ISO/IEC 17025 accreditation. This ensures their testing methods have been independently reviewed for reliability. MZ Biolabs is an example of an accredited option. Labs like Janoshik Analytical, while widely used in the research peptide community, are not ISO/IEC 17025 accredited — factor this into your confidence level when interpreting their COAs. This step is crucial to bridging the gap between what suppliers claim and what unbiased testing reveals.
Make sure to verify the QR code on the report and compare the lot number with the label on your vial. If they don't match, the test results might not be relevant to your specific batch. Avoid COAs older than 12 months and be cautious of reports with suspiciously round figures, such as exactly 99.00% purity or 0.00% impurities - these could signal the use of a generic template rather than actual testing.
Third-party testing comes with a cost. Community labs typically charge $200–$350, while professional ISO-accredited labs range from $600 to $1,500. Although this adds to your expenses, it’s a vital step in protecting your investment. For instance, Finnrick Analytics has analyzed over 4,500 samples from more than 169 vendors and found that 30% of grey-market peptides contained the wrong molecule. Spending a bit more on testing can save you from costly mistakes.
For critical applications, some buyers go a step further with "triple third-party testing." This involves sending samples to three separate certified labs and comparing their results to identify any discrepancies. While this method is more expensive, it offers the highest level of confidence in your peptide's quality.
Step 7: Organize and Cross-Check All Test Data
This step brings everything together by consolidating your test results to ensure consistent quality across batches. Start by gathering all relevant documents, including Certificates of Analysis (COAs), HPLC chromatograms, and mass spectrometry reports. Then, compare these documents side-by-side. Pay close attention to the vial's lot number and ensure it matches exactly with the lot number on every test document. If there’s a mismatch, the test data might not apply to your batch. Also, double-check the PDF metadata for the creation date - it should align with the batch timeline. Any inconsistencies could indicate potential fabrication.
After verifying these physical details, dive into the analytical data. Cross-check results from different methods, such as mass spectrometry (MS) and HPLC analysis, to ensure they align. Mass spectrometry helps confirm the identity of the molecule by measuring its molecular weight, while HPLC assesses its purity. Ideally, the observed mass should fall within 0.5–1.0 Daltons of the theoretical value for standard QC-grade instruments. If the HPLC purity is 98% but the mass deviates by more than 1 Dalton, the peptide may not be correct. Relying on just one method can leave gaps, so integrating these checks provides a clearer view of your peptide’s quality.
"Purity testing tells you about the quality and quantity of the target substance - not the total contents of the vial." – Peptard
Be cautious of numerical patterns that look templated or overly uniform. Check for realistic decimal variations in the data. If the supplier’s claims differ from independent third-party results by more than 5%, that’s a red flag. It’s also a good idea to monitor potency trends across batches from the same vendor. A drop in potency exceeding 5% compared to historical averages could signal an issue.
To confirm the authenticity of your documentation, leverage modern tools like QR codes or unique verification keys. These features allow you to cross-check the documents against online lab databases. For example, labs like Janoshik Analytical and MZ Biolabs include these features in their COAs, linking directly to databases for verification. Additionally, Finnrick Analytics offers a database of over 5,160 samples from 173 vendors, enabling you to compare your batch results with historical data. Keep a digital archive of all COAs and third-party results to track lot consistency over time. This organized approach ensures you maintain a reliable record of your peptide's quality.
What Peptide Purity Testing Resources

What Peptide provides a variety of educational tools to help buyers confidently assess peptide quality. These resources include in-depth guides on HPLC purity analysis, which explains how this method separates target peptides from synthesis by-products, and Mass Spectrometry (MS), which confirms molecular identity by measuring molecular weight. Together, these techniques ensure you receive peptides with the correct sequence and composition.
The platform also highlights the importance of understanding net peptide content through COA (Certificate of Analysis) frameworks. For example, a peptide might show 99% purity but have only 70–85% net content due to factors like residual moisture or counter-ions such as TFA or Acetate. This distinction is crucial for calculating accurate dosages in quantitative applications.
In addition to interpreting COAs, What Peptide offers harm reduction guides. These explain how to identify non-peptide contaminants, such as heavy metals and endotoxins, which may not be detected by HPLC alone. The platform also teaches users to leverage digital tools, like QR codes, to confirm the authenticity of test results through third-party verification.
A key takeaway from their guidance is the importance of a multi-faceted approach: always verify COAs using QR codes to guard against altered reports, and insist on both HPLC and Mass Spectrometry data rather than relying on a single method. This practical strategy helps ensure the peptides meet the highest standards of quality and safety.
Conclusion
Peptide purity verification is far more than just taking a supplier's word for it. A thorough, multi-step approach is necessary to navigate the risks of the largely unregulated peptide market and ensure the products you receive are both safe and effective.
Understanding the difference between purity and identity is key here. High-Performance Liquid Chromatography (HPLC) confirms the cleanliness of a sample, while Mass Spectrometry ensures you're working with the correct molecular structure. As highlighted by the Peptide Journal Editorial Team, "A vial could be 99% pure - but 99% pure of the wrong peptide". Relying on chemical purity alone isn't enough, especially given documented endotoxin contamination risks in gray-market products. For injectable use, endotoxin testing becomes non-negotiable.
The closure of major vendors like Peptide Sciences in March 2026 due to regulatory pressures underscores the need for researchers to take quality control into their own hands. This includes verifying batch numbers, checking QR codes against lab records, and adjusting dosages based on net peptide content, which often falls between 70–85% of the gross weight. As the Honest Peptide Research Team aptly states, "the burden of verification sits with the researcher".
Educational resources from platforms like What Peptide break down complex concepts, such as the distinction between HPLC purity and net peptide content, while also teaching how to spot red flags in Certificates of Analysis (COAs). By adopting these verification strategies, you not only protect your research outcomes but also safeguard your health. In a market with limited oversight, ensuring the quality of your peptides is essential to avoid everything from ineffective results to potentially severe health risks.
FAQs
What’s the difference between HPLC purity and net peptide content?
HPLC purity measures the percentage of a peptide sample that matches the intended peptide. This analysis helps identify impurities or by-products, giving a clear picture of the sample's chemical purity.
On the other hand, net peptide content refers to the total amount of peptide available in a vial or solution, often expressed in milligrams or milliliters. While HPLC purity focuses on quality, net peptide content highlights quantity. Both metrics are critical for determining whether a product meets the required standards.
How can I tell if a COA is real and matches my vial’s lot number?
To confirm that a Certificate of Analysis (COA) is genuine and corresponds to your vial's lot number, start by checking for batch-specific details like the lot number and manufacturing date. These should match the information on your vial’s label. Additionally, review the testing data, such as results from HPLC or mass spectrometry, which provide detailed analysis. Make sure the COA originates from a reliable, independent lab to ensure impartial verification. Lastly, always cross-check the lot numbers to ensure consistency.
Which extra tests matter most beyond HPLC and MS (endotoxins, metals, solvents)?
Testing for endotoxins, metals, and residual solvents plays a key role in ensuring the safety and purity of peptides. These tests are critical for detecting contaminants that might compromise the quality of the product or present potential health risks. Together, they offer a thorough approach to verifying the overall integrity of the peptides.